Tuesday, September 24, 2013
Sausage Biscuits
Eat your heart out, McDonalds. Literally, if possible, actually. Because this vegan, from-scratch version of a breakfast classic is tastier, healthier, and 100% cruelty-free.
The best part? Neither the buttermilk biscuits, nor the sausage is difficult whatsoever. In fact, most of this can be prepped beforehand to make morning snappier than popping those rock-hard frozen Jimmy Dean breakfast sandwiches in your microwave, minus the heartburn.
Let's start with the biscuits.
Gather your ingredients and preheat the oven to 450. In addition to the kitchen basics shown above, you'll also need almond milk and earth balance butter. Note: taking the butter out now, a few minutes before adding it into the dough is helpful when working with it later. Also, I used sweetened almond milk, to counteract the "buttermilk" flavor that will be emulated.
To duplicate buttermilk, add 1 tsp of apple cider vinegar (Bragg's is always best) to 3/4 cup almond milk. Set aside in fridge to curdle. Just like the real thing.
Next, combine all the dry ingredients in a large mixing bowl. Then, use a fork to cut the butter into the dry ingredients until the texture is coarse.
Quickly mix in the milk,
...and form dough into a ball in the bowl. Refrigerate this for 20-30 minutes.
Now, I will tell you right now I am a terrible baker. This is because I fail to follow what seems to be silly instructions such as chilling the dough. Or preheating the oven. Or using a timer. Or adding baking soda. What can I say- an experimental cook like myself just isn't born with the precise, mathematical patience of a baker. So trust me- if I include a step as necessary, it's because I've tried to skip it and failed miserably, so it's likely pretty important.
Don't go press play on the DVR just yet, though. While the dough is chilling, we can start on the sausage.
Boil 1/2 cup water and gather your dry ingredients.
Once the water is boiling, turn it off and add 1/2 cup TVP. Stir, and let set for about 5 minutes to allow the TVP to re-hydrate.
Every vegan kitchen has these two ingredients on hand at all times: ground flax seed, and nutritional yeast. Both necessary for countless recipes, and extremely healthy to add to your diet. Flax in particular is a wonderful binding agent and can be used as an egg replacer, as when combined with water flax becomes extremely gelatinous. In this recipe, this is exactly what it is used for.
Add in all dry ingredients and spices and mix well to incorporate the flavors completely.
Now, add the remaining ingredients: Bragg's liquid aminos (or soy sauce), maple syrup, and the liquid smoke mixed with water.
This is what I mean by liquid smoke in the 1/4 cup water. It doesn't need to sit or anything, but by combining the water and liquid smoke together, the liquid smoke can evenly distribute throughout the dough.
It will look like this when ready. Go ahead, take a pinch and eat it. It already tastes damn good.
Heat up about 1-2 tbsp of oil in a large skillet (that will fit a lid), and form your sausage patties by hand. One batch should yield about 8 patties.
Fry them on the skillet at medium-high heat, covered, for about 3-5 minutes, until a nice crispy brown.
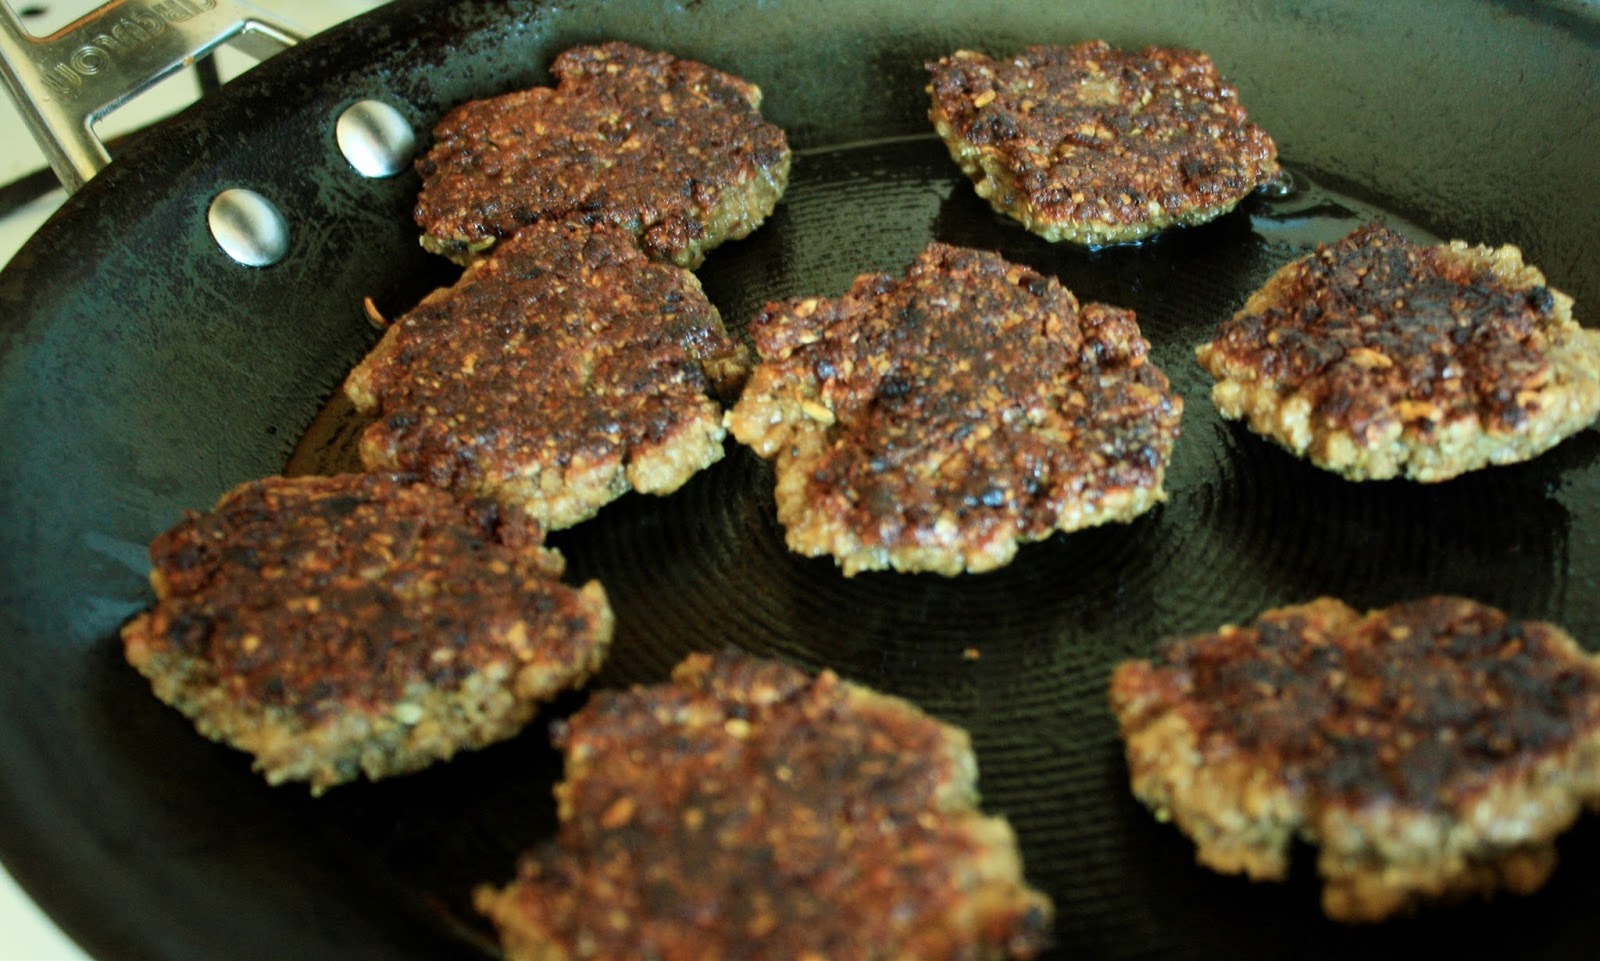
Flip the patties over and reduce heat to medium. Cook, still covered, another 3-5 minutes until they are both steam cooked in the middle and a crispy brown on both sides. They will smell like sausage, and look like sausage, but don't trip out; I promise there are no secret, poisonous ingredients snuck in this recipe.
Now, back to the biscuits. Logically, it is time-efficient to pull the biscuit dough out once the sausage mixture is combined (before making them into patties). This way, the biscuits can be in the oven while you finish up the sausage. It just seemed a bit confusing to go back and forth with pictures and instructions on the blog itself.
So, remove the dough from the fridge and place on a clean, floured surface. Knead for about 1-2 minutes until smooth.
Roll out dough to about 1/2 inch thick. Cut into rounds using a biscuit cutter or more practically, a small glass jar. You should be able to get 8 biscuits from the dough.
Bake on an ungreased cookie sheet 10-12 minutes in your preheated 450 degree oven.
They should come out looking scrump-dilly-umptious indeed.
Now if you took my advice and timed it right, the sausages will be ready about the same exact time as the biscuits. If not, I won't mention all the times I've used a toaster oven to keep half the meal warm each time I don't time it right either.
Cut these babies in half and liberally spread some butter onto each side.
Place a patty on each bottom, and make cute little delicious breakfast sandwiches. Double-fisting is, in fact, necessary here.
Sausage & Buttermilk Biscuit Breakfast Sandwiches
Prep time: 25 minutes Cook time: 10-12 minutes
Total: approx 35-40 minutes
Makes about 8 sandwiches
Buttermilk Biscuits:
2 cups flour
2 1/2 tsp baking powder
1 tsp baking soda
1/2 tsp salt
4 tbsp butter
3/4 cup almond milk
1 tsp apple cider vinegar
Sausage Patties:
1/2 cup boiling water
1/2 cup TVP
1/4 cup oat bran
1/4 cup whole wheat flour
1/4 cup vital wheat gluten
1 tbsp nutritional yeast
1 tbsp ground flax seed
1 tsp garlic powder
1/2 tsp ground sage
1/2 tsp fennel seeds
1/2 tsp black pepper
1 tsp brown sugar
1/4 cup water/ 1/2 tsp liquid smoke
3 tbsp Bragg's liquid aminos OR soy sauce
1 tbsp maple syrup
oil (for frying)
Preheat oven to 450 degrees.
Combine milk and vinegar in small bowl, set aside in fridge to curdle and create buttermilk.
Combine flour, baking powder, baking soda and salt into large mixing bowl and mix well.
Cut butter into mixture with a fork until coarse in texture. Quickly mix buttermilk into flour mixture.
Form ball of dough in bowl, and set in fridge to chill for 20-30 minutes.
Boil 1/2 cup water in large saucepan. Add TVP and turn off heat, allowing TVP to set for 5 minutes.
Add all dry ingredients to pan: oat bran, vital wheat gluten, whole wheat flour, nutritional yeast, ground flax seed, garlic powder, ground sage, fennel seed, black pepper, and brown sugar. Mix well.
Add in remaining ingredients (except for oil): liquid smoke (set in 1/4 cup water), Bragg's, and maple syrup. Stir until totally combined.
Remove chilled biscuit dough from the fridge. Knead dough on a clean, floured surface 1-2 minutes until smooth.
Roll out dough to 1/2 inch thick. Cut into rounds.
Bake on ungreased cookie sheet for 10-12 minutes.
While biscuits are cooking, cook sausages. Heat large frying pan (that has a lid) with 1-2 tbsp of oil.
Form patties by hand (about the size of your palm), making 8 total. Fry in oil at medium-high heat, covered with a lid, for 3-5 minutes until brown. Reduce heat to medium, then flip and fry, covered for another 3-5 minutes. When done, the patties should be cooked on the inside, and an even crispy brown on the outside.
Remove biscuits from oven.
Cut biscuits into halves. Spread butter along both sides of all biscuits.
To assemble the sandwiches, simply place a patty on each bottom, and cover with a top.
Voila!
Saturday, August 31, 2013
Chocolate Breakfast Milkshake
Yes, you read that right. A chocolate shake...for breakfast.
See, us crazy vegans know how to indulge. And indulge, we do. Now, maybe double chocolate french toast doused in maple syrup and powdered sugar is a bit much for breakfast every day, but this chocolate shake is 100% guilt free and can be consumed by das boot full. Because every ingredient is not only totally healthy, but exactly what you need to start the day. Including the euphoria of drinking a milkshake for breakfast.
See? I promised it was just breakfast food. And the dark arts to summon the dessert gods.
I also need to apologize
ahead of time for posting two smoothie recipes back to back; between battling
strep throat and then traveling cross country, a girl's gotta work with the
time she is given. I assume many of you have this whole "life" issue
that comes up from time to time as well, however, and this goes to show that
even with minimal time and energy, cruelty-free, easy, and healthy meals are
steal 100% possible!
This, by the way, was
actually my teenage brother's idea if you can believe it. His original recipe
was created as ice cream in order to incorporate important nutrients and a
lasting burst of energy for an after school snack before his sports. I've since
adapted his incredibly tasty idea into a decadent morning meal, and it has
rapidly become a staple in my life.
All you need is a half an
avocado, two frozen bananas, a handful of frozen blueberries,a little cacao
powder and maca powder, and a cup of almond milk. These are things that are in stock for me all the time anyway. So when there is no time to spend cooking up
potatoes, or a bowl of soggy oatmeal would only intensify a drab and moody
morning, you can magically have a tasty treat that more than qualifies as a
meal in literally 5 minutes.
Here is why:
Cacao powder is derived from cocoa beans as we all
know (which do, in fact grow on trees, so in my mind this qualifies cocoa as
plants, meaning chocolate is basically salad...no?). When eating chocolate raw-
as in unprocessed and without the added sugars and fats- it can actually be an
incredibly healthy part of your diet. It contains several essential minerals,
is an antioxidant, contains vitamins B1, B2, B3, B5, B9 and E, as well as
protein and fiber. It is great for digestion, lowering blood pressure, heart
health, toxic cleansing, and mental health. It is also a wonderful natural
substitute for caffeine- without the crash of coffee. I could go on and on
about chocolate's health benefits because, who doesn't want to qualify dessert
as a health food, but for more read up http://www.builtlean.com/2012/04/12/raw-chocolate/ and
eat up!
Blueberries are one of those
fruits we need to incorporate into our lives daily. These amazing little
berries are mostly famous for their antioxidant properties. This means they are
anti-aging, anti-inflammatory, help in weight loss and improve skin health
far more than Hollywood's latest cream fad. Your brain, heart, and eyes will
all benefit from this fountain-of-youth-level superfood. By eating two cups of
fresh blueberries a day, the chances of getting cancer (namely ovarian)
and Alzheimer's disease are dramatically reduced. Plus they are delicious.
Avocado also provides the
body with essential fats- especially for those on low carb and grain-free
diets. Healthy fats are actually necessary when
maintaining or losing weight and controlling cholesterol, and because avocados
are high in healthy fats but low in fructose, it is a definite asset in a
balanced diet. In fact, by eating this magical fruit, your body is able to absorb nutrients from other foods as well- by 400%! The avocado itself also provides close to 20 nutrients, including fiber,
potassium, and folic acid, as well as vitamins A, C, E, and K and B vitamins. Avocados are another incredible source of energy, making them a great addition to a morning meal. But because they also strengthen hair, skin, and are anti-aging (both when consumed and directly applied!),
avocados should simply be staple.
Almond milk has been gaining popularity at a rapid pace recently, and there is no question why (read about how strange/gross/unhealthy drinking dairy milk is here: http://www.nomeatathlete.com/milk//). While I still use coconut and rice milk in certain things, almond milk is my go-to. Almond milk is rich in vitamins, including A, D and E. In fact, one serving will give you half of your required daily intake. It is therefore high in nutrients, acts as an antioxident, promotes growth, bone and teeth health, and immunity. It is high in calcium, as well as phosphorus and magnesium. Consuming almonds and almond milk regulate blood pressure and lower cholesterol. It is perfect to add to morning shakes and smoothies especially, as a good source of protein and energy. Because it is a low-calorie food with no saturated fats, like avocado almond milk actually helps you to maintain and lose weight.
Bananas, as most of us know, are high in potassium and fiber. For this reason, eating bananas increase overall cardiovascular health by reducing blood pressure, preventing heart disease, reducing the risk of stroke, and promoting bone health. Bananas are also a natural antacid and decrease heartburn as well as protect against ulcers by strengthening the lining of the stomach. They contain vitamins B6 and C, as well as magnesium, making them one of the world's most healthiest foods. Bananas are great to eat right before and after a workout as an energy kick, to sooth muscle cramps, and to maintain blood sugar levels. The iron in bananas help with anemia, as well as overall blood health and to combat diabetes. They also strengthen and improve bones, eyesight, brain function, digestion, and are high in antioxidants. Oh, and they improve mood and help with depression. So why aren't you eating this every day?!
Maca powder in this recipe is,
again, technically optional. The taste is unaffected with or without
it. But once you read the health benefits of this miraculous superfood on
my last post, Green Tea
Power Smoothie, you'll understand why it won't be an optional ingredient for
very long.
Throw all the ingredients in the blender and blend it up until you have....
...A fricken milkshake.
Now your naughty little day can begin.
Chocolate Breakfast Shake
Time: 5 minutes
Makes 1 giant shake
Ingredients:
2 frozen bananas
1/2 avocado
1/2-1 c. frozen blueberries
1 c. almond milk (sweetened or unsweetened)
2 tsp. Maca powder (optional)
1 tbsp. Cacao Powder
Blend until smooth.
Tuesday, August 20, 2013
Green Tea Power Smoothie
We've been rather sick the past few days at our house. As in, we've watched a good half a season each of Buffy and Angel in bed kind of sick (oh it has been soooo horrible...). Consequently, we have also been living off of popsicles and smoothies to try and soothe our sore throats and with luck and a good witch doctor, boost our bodies' natural immune systems (again with the torture). This green tea smoothie has been a product of such a weekend, and it is absolutely marvelous. So much I am drinking my third batch right now.
There is so much packed into this little treat, it's no surprise you'll feel a little burst of energy and just a sprinkle of happiness as you sip it. Whether you're feeling under the weather, need to cool off during this late-summer heat wave, or just want a damn good smoothie, this will be in your hand and down your throat faster than you can say Starbucks drive-thru.
First boil one cup of water and steep 2-3 greet tea bags. You want the tea to be strong, but "strong" is different for everyone.
Green tea is one of those health miracles that you have always just known about. But don't worry, everything you know is true, and then some. This long list of how green tea benefits you include: it increases metabolism, prevents cancer and heart disease, reduces cholesterol and blood pressure, improves skin, helps combat depression, relieves stress and anxiety, helps with asthma as well as allergies, and is both anti-viral and anti-bacterial. Above all, and why I am drinking it now, is it's miraculous ability to boost and strengthen one's immune system. This is because of the high potency of active antioxidants it contains.
Also, you want your green tea chilled. This is how I do it when I'm being impatient.
You are also going to need a cup of frozen almond milk. I usually keep an ice tray of milk in the freezer stocked and ready. You never know when you'll want a smoothie, and freezing stuff takes forever. Apparently, 3D printable guns are a higher priority on the technological advancement list than freeze-rays.
Additionally, you need 1 cup, tightly packed baby spinach and 2 frozen bananas. The best way to store frozen bananas is to un-peel and wrap individually with saran wrap. The last time I went shopping, however, I guess I was too lazy and just threw them in the freezer. In this case, cut the bananas into fours still peeled, then use the knife to separate the skin from the fruit. It should just come right off, but sometimes you have to actually cut it off. Your fingers are at this point going to be frozen. So don't be lazy and take two minutes to saran wrap the whole bunch instead.
Lastly, the maca powder. You will need 1 tbsp. Technically, this is TOTALLY optional as it doesn't improve the taste or anything, but it dramatically improves the health benefits of the smoothie overall.
Maca powder is easy enough to find- most health food stores carry it. It is, however, on the pricey side. I got my bag from Sprouts for almost $20. But it does last quite a while, since each serving is only 1 tsp - 1 tbsp. And it is useful because you can put it in tons of things, from yogurt to salad dressings to smoothies. Here is why it is such a rewarding investment:
Maca is a root from Peru, and has been deemed a "superfood". This means there several health benefits found in many other foods, is contained all within this one substance. The way I initially discovered maca root was actually through my younger brother, who was blending the powder in his pre and post-work out protein shakes for an added boost- maca increases energy and endurance, as well as helps to build muscle. Tastes better than steroids, too. Once I tasted his chocolate shake with this magic stuff hidden deliciously inside (that recipe will come very, very soon), I had to know more. My own health battles include warfare on my hormones and is one of the many reasons I finally went vegan. Guess what? Maca aids in hormonal balance. It also: treats thyroid disorders, helps with bone and tooth health, enhances libido, regulates menstrual cycles, improves overall stamina, alleviates depression and mood swings, reduces anemia, assists the circulatory system, reduces anxiety and stress, enhances memory and mental function, improves skin health, is an antioxidant, anti-carcinogen, anti-fungal and anti-bacterial, stimulates appetite, aids in digestion, fights cancer, strengthens overall immunity, and acts as a pain reliever, expectorant, and sedative. Whoo! That was the abbreviated list.
All these benefits are due largely in part to the potent amounts of calcium, phosphorus, vitamins B1, B2 and B12, C,E, calcium, zinc, iron, magnesium, phosphorus, amino acids, fatty acids, sterols, alkaloids, fiber and protein that the maca root contains.
Totally worth that $20.
So you throw all those whole five or six ingredients in your blender and...well, blend.
Tada. Tasty magic green smoothie.
Green Tea Smoothie
Makes 2 smoothies
1 c. chilled green tea
Juice of 2 oranges (approx. 1/2 cup)
1 c. frozen almond milk (sweetened)
2 frozen bananas
1 c. baby spinach (packed tightly)
1 tbsp. maca powder
Blend all ingredients until smooth.
Thursday, August 15, 2013
Kung Pao Tofu Lettuce Wraps

Do you want to know why lettuce wraps are so kick-ass? Because it is totally acceptable to eat at least five or six guilt-free. And these kick even more ass, because they have just the right amount of kick in the spice department.
A week or two ago I threw a bunch of ingredients into a pan and produced a magical end product that was somehow perfectly kung pao. So when my latest lettuce wrap craving crept in, I naturally decided to combine the two into one awesome, easy, ass-kicking dish.
I almost hate to do this to you again, but this is another recipe that requires just a tad bit of prepping. If you are in a time crunch, or if your patience level is pregnant-woman low today, you can skip a step or two by using a package of already baked tofu. But as always, doing it all yourself tastes better in the end, so the first thing you have to do is press your package of extra-firm tofu for about 30 minutes. Otherwise you'll get soggy tofu. Gross.

To press the tofu, I just take it out of the package, wrap it in paper towel and place it on a plate, and then place another plate on top. Then I get classy and balance a sauce pan on the top plate, and fill the pan with a bunch of heavy cans. After a half hour, I play a little jenga when removing the Dr. Suess tower from my tofu, unwrap it, and voila. Just call me Giada De Laurentiis.

While the tofu is being pressed, you can prepare the veggies. Toss one grated carrot, 1 c. bean sprouts, and 4 diagonally-chopped green onions in a bowl with the juice from two limes (about 1/4 c.). Store in the fridge until it's time to top the wraps.

Next, prepare the marinade by combining all the ingredients in a shallow container. If you don't have Bragg's on hand, go ahead and use regular soy sauce. I am just trying to cut my soy sauce back because I cook a lot with it. But for a marinade, I actually prefer the Bragg's anyway.


To press the tofu, I just take it out of the package, wrap it in paper towel and place it on a plate, and then place another plate on top. Then I get classy and balance a sauce pan on the top plate, and fill the pan with a bunch of heavy cans. After a half hour, I play a little jenga when removing the Dr. Suess tower from my tofu, unwrap it, and voila. Just call me Giada De Laurentiis.

While the tofu is being pressed, you can prepare the veggies. Toss one grated carrot, 1 c. bean sprouts, and 4 diagonally-chopped green onions in a bowl with the juice from two limes (about 1/4 c.). Store in the fridge until it's time to top the wraps.

Next, prepare the marinade by combining all the ingredients in a shallow container. If you don't have Bragg's on hand, go ahead and use regular soy sauce. I am just trying to cut my soy sauce back because I cook a lot with it. But for a marinade, I actually prefer the Bragg's anyway.

Chop up the tofu into little bite-sized cubes and let sit in the delicious marinade for at least a half hour, but ideally a full hour if you can take it. Turn often to coat fully. Make sure to reserve 1/4 cup of the marinade for the sauce.
Note: if you're using the pre-baked tofu, you can skip the pressing and baking steps, but the marinade is still key in the kung pao flavor here.

Line a cookie sheet with foil, and bake the tofu at 400 degrees for 15 minutes. Baking is important. Your tofu won't fall apart when you go to fry it, and the texture will be browned and crispy on the outside, but melt-in-your-mouth delicious on the inside. If you have never been a tofu fan, or you've had to endure soggy, tasteless tofu crumbles before, it's likely because it wasn't baked first. It makes all the difference.

While the tofu is baking, prepare the sauce that will be used to fry it up in.

Simply stir into the marinade reserve: 1/4 c. soy sauce (here I am going to use real, gluten-free soy sauce), corn starch, brown sugar, red chili pepper flakes (optional for more heat), and toasted whole sesame seeds.

You are almost ready to fry some tofu up! First, chop up 2 red chilis. I am a baby, so I have to de-seed my peppers, but if you want to up the spice level even more, use your own tastebuds' discretion.

You're also going to need about a tablespoon of grated ginger and 2 cloves of minced garlic. This is one of those rare moments where I take the easy way out. I suck at mincing garlic. I can never chop it small enough and it sticks to the knife and usually I always need more right in the middle of cooking. So, I cheat with these jars of minced garlic, especially when it comes to sauteing and frying. Judge me, or just join my genius and keep a jar on hand for yourself.

Note: if you're using the pre-baked tofu, you can skip the pressing and baking steps, but the marinade is still key in the kung pao flavor here.

Line a cookie sheet with foil, and bake the tofu at 400 degrees for 15 minutes. Baking is important. Your tofu won't fall apart when you go to fry it, and the texture will be browned and crispy on the outside, but melt-in-your-mouth delicious on the inside. If you have never been a tofu fan, or you've had to endure soggy, tasteless tofu crumbles before, it's likely because it wasn't baked first. It makes all the difference.

While the tofu is baking, prepare the sauce that will be used to fry it up in.

Simply stir into the marinade reserve: 1/4 c. soy sauce (here I am going to use real, gluten-free soy sauce), corn starch, brown sugar, red chili pepper flakes (optional for more heat), and toasted whole sesame seeds.

You are almost ready to fry some tofu up! First, chop up 2 red chilis. I am a baby, so I have to de-seed my peppers, but if you want to up the spice level even more, use your own tastebuds' discretion.

You're also going to need about a tablespoon of grated ginger and 2 cloves of minced garlic. This is one of those rare moments where I take the easy way out. I suck at mincing garlic. I can never chop it small enough and it sticks to the knife and usually I always need more right in the middle of cooking. So, I cheat with these jars of minced garlic, especially when it comes to sauteing and frying. Judge me, or just join my genius and keep a jar on hand for yourself.

Fry time! Heat 1 tbsp sesame oil in a large pan at medium-high and saute the ginger, garlic and chopped red chili peppers for about 3 minutes. Pour in the fry sauce and stir everything together really well. Dump the tofu in and mix gently. Cook until the sauce starts to boil, then turn the heat down to medium low and let simmer about 5 minutes or so, until the tofu is caked with thick sauce.


All you need is about five minutes to make this amazing peanut sauce that will top your wraps like whipped cream on an ice cream sundae. And since Kung Pao usually has peanuts in the dish, a peanut sauce makes perfect sense.
In bowl, combine peanut butter, lime juice, rice vinegar, brown sugar, salt, wasabi paste, red chili pepper flakes, and chopped cilantro.

In bowl, combine peanut butter, lime juice, rice vinegar, brown sugar, salt, wasabi paste, red chili pepper flakes, and chopped cilantro.

Whisk it all together until it's well blended, spicy, and delicious.

This, by the way, is wasabi paste. I found it for a few bucks at WinCo, so it is really easy to find. As much as my mouth prefers mild-level heat, I can eat wasabi right out of the tube. Weird.

Turn off the skillet and wash some butter leaves. Take a moment to revel in how pretty and fresh butter leaves are. I almost feel bad that I'm about to eat it. Almost.

Scoop the tofu onto a little taco-shaped leaf. Top with the veggies and the peanut-sauce. Make a plateful of them. Don't share. Devour and breathe fire the rest of the day. You deserve it.


This, by the way, is wasabi paste. I found it for a few bucks at WinCo, so it is really easy to find. As much as my mouth prefers mild-level heat, I can eat wasabi right out of the tube. Weird.

Turn off the skillet and wash some butter leaves. Take a moment to revel in how pretty and fresh butter leaves are. I almost feel bad that I'm about to eat it. Almost.

Scoop the tofu onto a little taco-shaped leaf. Top with the veggies and the peanut-sauce. Make a plateful of them. Don't share. Devour and breathe fire the rest of the day. You deserve it.

Kung Pao Tofu Lettuce Wraps
Prep time: 60 minutes, Cook time: 25 minutes
Total time: approx. 90 minutes
makes about 8 wraps
For the tofu:
For the tofu:
1 package extra-firm tofu
1 head butter lettuce
2 cloves garlic, minced
2 red chilies, chopped
1 tbsp. fresh ginger, grated
1 tbsp. sesame oil (for frying)For the marinade:
1/2 c. vegetable broth
1/8 c. Bragg's liquid aminos (or soy sauce)
2 tbsp. white wine vinegar
2 tsp. sriracha
1 tbsp. sesame oil
1 tsp. chili powder
1 tsp. ground ginger
1 tsp. garlic powder
For the fry sauce:
1/4 c. marinade reserve
1/4 c. soy sauce
2 tsp. corn starch
2 tsp. brown sugar
1 tbsp. toasted whole sesame seeds
1 tsp. red chili pepper flakes
For the veggies:
For the veggies:
1 carrot, peeled and grated
1 c. bean sprouts
4 green onions, chopped
Juice of 2 limes (approx. 1/4 c.)
For the spicy peanut sauce:
3/4 c. chunky peanut butter
1/4 c. rice vinegar
Juice of 1 lime
2 tbsp. brown sugar
1-2 tsp. wasabi paste
2 tbsp. cilantro, finely chopped
Pinch of salt
1 tsp. red chili pepper flakes (optional)
Wrap tofu in a paper towel and press on a plate for 30 minutes. Drain and cut into small cubes.
Prepare marinade by combining all ingredients in a shallow container. Marinade tofu for at least 30 minutes, turning occasionally to coat. Reserve 1/4 c. of marinade mixture for fry sauce.
Preheat oven to 400 degrees. Line baking sheet with foil and place tofu evenly. Bake for 15 minutes.
Peel and grate one large carrot and place in bowl with bean sprouts and chopped green onions. Toss with lime juice and store in fridge until ready to use.
Prepare fry sauce. Add all ingredients to marinade reserve in a bowl and stir well.
Remove tofu from oven. In large saute pan, heat 1 tbs. sesame oil. Saute grated ginger, minced garlic, and chopped red chili peppers for about 3 minutes on medium-high heat. Pour in fry sauce and mix well. Add baked tofu and cook until sauce begins to boil. Turn down heat to low and simmer for about 5 minutes, until sauce is sticky and the tofu is fully coated.
Prepare spicy peanut sauce. Combine all ingredients and whisk until mixed completely.
Rinse head of butter lettuce. Fill each leaf like a taco, with tofu, veggies, and topped with spicy peanut sauce.
Enjoy!
Subscribe to:
Posts (Atom)


